


Confession - I found this pattern in early February, my birthday month, and fell hard for it. Happens that 1948 is my birthday year. The pattern reminds me of those ladies in early TV sitcoms who get up in the morning looking swell, and in movies of the 40's, who spend the day in a floaty housecoat until dressing for an evening of dining and dancing (with Fred Astaire). Oh, and Lucy!
Since zip locking my business suits, I've been looking for clothes that help me achieve 'swell' and keep it all day. This as opposed to jeans or yoga pants or, ouch, pajama bottoms and a tee shirt. The Serendipity kimono dress works well for me, and this retro robe (let's call it a housecoat) is another keeper.

I knew right away I would bypass the tie belt and modify the pattern with an inset waistband. It is such a good look and so classic. I am not very fussy and have little patience for hooks and inside ties on wraps. A waistband looks good coming and going, and the gathers on the back bodice of the pattern play beautifully into the higher waistline. (waistband how-to at the end of the post).


This red fabric is Tutti Fruitti Small Polka Dot from JoAnns. I have not sewn it before and ordered it online, so I was unsure of what I was getting. At first it seemed a bit strange. It's like a heat-pressed seersucker, a bit stiff, even after laundering. And it kind of dulls a sewing machine needle! Pull out stitches and you have holes, they are not going to close up. I really almost gave up on it after stitching a few pieces. But in the end, it's actually very comfortable, very cool, and does not wrinkle at all - I've grown fond of it and will probably buy some more of this funky fabric!
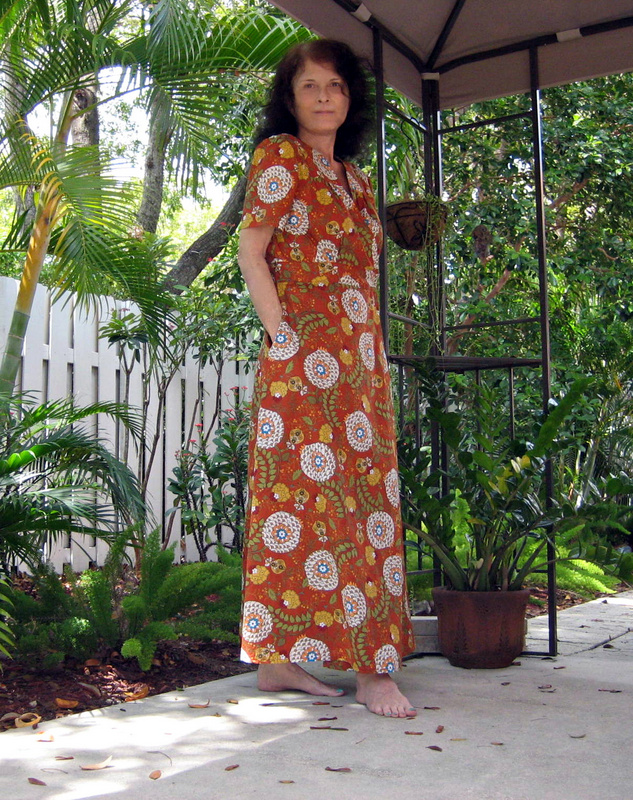
This beautiful fabric is from Art Gallery Moorish Blossoms line. I love their fabrics, very smooth cotton prints that launder nicely and hold their vibrant colors so well. Can be a bit pricey for a 5 yard item, but I'm always on the lookout for Art Gallery on sale.
Comments on the pattern:
I sewed a size 14, my usual size. My muslin was sewn with the original waist, not modified, so I do know that the back and front bodice length are a good fit for me. I am a bit long in the torso, so this might be a flag for someone else. The sleeves are comfortable and do not pull across the back, another plus for me as I have broad shoulders as well. The skirt has ample hem allowance, no problem at 5'7".

The front bodice and yoke are a bit tricky. The yoke is inset on a curve inside the bodice armhole edge and has a mitered corner. Fortunately the pattern pieces go together well, but a caution not to stretch the curved cuts out of shape. I basted generously and pressed in sew lines before stitching the miters and curves. Then I used 1/2" steam-a-seam to turn in the yoke facing edges, again to prevent stretching when I handled the fabric.
There are so many ways to modify this pattern, not just for a housecoat, how about a wrap dress! For now, I'll be making a couple more for 'at home', it's just my style.
Here's how I managed the inset waistband...
Inset Waistband Instructions
New pattern piece:
- Draft a waistband, 44" long by 3 1/4" wide. The length is dependent on your size, but be generous.
- Fold the pattern in half end to end and mark the center back.
- Beginning at the center back, on the upper and lower long edge, capture markings from the skirt top edge, AS THOUGH THE SKIRT WERE SEAMED.
- Be sure to include dots marking the placement of bodice gathers.
- Cut 2 waistbands, one for the outside of the garment, one for lining.
Bodice adjustment:
- Remove 2" from the bottom of the three bodice pieces before construction begins.
- Mark the new bodice bottom edges with all markings from the original pattern. Simply move the markings up.
Construction:
- Follow pattern instructions through step 36, skirt side seams.
- Go to and complete step 39, hem skirt opening.
- Pin the long edge of one waistband to the bodice on the outside, right sides together. Match symbols and side seams, adjusting gathers. Baste.
- Pin the second waistband (lining) to the bodice on the inside, right side to the wrong side of the skirt. Match markings as above. Stitch the waistband and bodice pieces together.
- Trim and press.
- On the outside, pin the skirt to the waistband, right sides together. The bodice and skirt front edges should enter the waistband along the same vertical line. Stitch.
- Trim and press the seam towards the waist.
- On the inside, complete the waistband lining. Fold the bottom edge under 5/8" and press. Trim to 3/8".
- Baste the lining on the waist/skirt stitching line.
- Fold, trim, and baste the ends of the waist inset.
- The finish here is a matter of taste. I hand stitch the lining in place and get a bit fussy about squaring and neating the ends.
- That done, on the outside topstitch the waistband all way round.
- Fit the housecoat for a comfortable wrap and mark the waistband for two closures.
- I used size 16 prong snaps, set about 7 3/4" apart. So easy to put on and take off the housecoat with snaps!
- Finish closures, matchine stitch the hem and enjoy.
These are lovely- I think they really start a day off right!
ReplyDeleteOh my.....what nice robes you have. I really like the fabric of the second one shown here! Love how they look - they must feel great on too! Nice work!
ReplyDeleteI agree, I would love to have one of these lovelies! My favorite is the Tutti Fruitti! Love them!
ReplyDeleteI love this pattern, and have really wanted to do something with it, but hadn't considered making it into a house-dress like this. Genius!
ReplyDeleteAlso: just found your blog, and am in love with it. Thank you! :)
Laura, thank you so much! If you make one,pls be sure to send me a link! And oh my gosh, I love that you love my blog...wow. Blogger friends are the best. Coco
Delete