Showing posts with label Kwik Sew. Show all posts

Saturday, February 13, 2016

Working the faux Mociun tie-front dress...


Version by Lela Rose, $800
Mociun original, $350


Apparently I missed out on all the Mociun dress commotion of about 5 - 6 years ago. I wasn't blogging then, and I definitely was not spending $250 or more on a casual dress!

But earlier this week I just happened to see a bevy of real and faux Mociun's on Pinterest, including some made by sewing bloggers. Wow. I like this design.


So - off to my patterns to see what might work as a starting point for that bodice. I decided to use the Kwik Sew 3782 pussy-bow blouse. It has sleeves (which I want) and a v-neck with a tie.


This was a pretty easy alteration, I just had to think it through and keep track of my changes.
  • The sleeves were the easiest part! I straightened the underarm by dropping the seam line straight down from the armhole.
  • Shortened the bodice by about 2 1/2" above the natural waist marking on the pattern.
  • Narrowed the bodice quite a bit, to end up with 39" across the bust and 35" at the lower edge.
  • Fashioned the bodice front with a 3" opening at the lower edge, to allow for knotting the tie fairly tightly across the bust. I've seen other versions that left the 3" opening in the skirt instead of the bodice. But this approach works really well and doesn't hike up the skirt in front when it's tied.  


Finishing the lower bodice at center front - a 1/2" SA, folded under twice and topstitched.

  • The tie is 2 pieces, 8" wide by a yard long, cut on the bias and sewn together. Eventually I shortened it quite a bit. On this version, the tie is 11 1/2" long from the point at which it exits the bodice. And I might shorten it again by an inch or so.


  • The skirt is two rectangles, 27" wide by 31" long, gathered and attached to the bodice. I crossed the bottom of the bodice by 1/4", before attaching the skirt.
  • And put side seam pockets in the skirt, about 5" below the top edge.

There's only light gathering of the skirt under the center front, to decrease bunching when the dress is tied.


This cotton fabric is from Holly Lobby - and it drove me a little batty, because it had a persistent twist in it. Matching the print at the seams was harder than it should be. But - this version is a muslin, so I lightened up. I do like the print, though, and plan to get something similar from somewhere else!


I've also decided to take a couple inches off the hem on my next one.


This was a pleasant little project, and it kept me out of trouble for a week :-) 

Hope you're having a nice weekend - Coco

Saturday, January 30, 2016

Jungle January final makes...


And we come to the end of Jungle January...

I picked up loads of animal print fabrics over the year 2015, and I still haven't sewn all of them. Here are a couple things that I did finish, both in patterns I've blogged before.

What would the month be without a version of my TNT Jalie Cocoon cardigan. Love this thing.


It's a snakeskin print - a Maggy London jacquard double knit from Fabric Mart. Nice. I've been watching for more of this fabric. It's smooth like a ponte de roma, just a little heftier. And a breeze to sew in this pattern.


I was cruising QVC recently, looking at cardigans for ideas, and found this one from Halston for $65, and identical to the Jalie version. Which means I have $325 worth of cardigans in my closet...

 
More bottoms, this time in McCalls 6291 elastic-waist cargo pants. Another favorite that I've used to make both pants and shorts.


This crazy stretch denim is also from Fabric Mart, and it's one of the strangest fabrics I've sewn. The blue spots feel almost rubbery, kind of like puffy fabric paint (yes, I used a bunch of it when I was on my painted tee shirt journey).

I tested it with the iron, and decided not to push it! I didn't want blue goo all over my iron sole plate, so I used a calico pressing cloth.


On this pair I used one cargo pocket, no flap, but buttoned down, on each lower leg. I know they're lost in this print, but they're cute in real life. I also added 5 belt carriers, and then decided not to use them. The fabric is a little heavy with all those blue things, and the carriers made the waistband very stiff. My seam ripper got a real workout removing the waistband and carriers, I probably need a new ripper now.
 

The black slouchy turtleneck I'm wearing is Kwik Sew 4069. Andrea, this is for you :-) and thank you for pointing out that black is a good color for me! I've enjoyed this top.
 

The pattern is very simple and has two collar variations, folded or standing turtle. A caution: measure your neck, try on the collar, and modify it as needed, before you sew it on. I took 3.5" off the width of my standing collar for an almost-snug fit.

Thanks again, Anne, for a fun January. And I'm off to watch the replay of the Australian Open women's final...great stuff.

Ciao! Coco


Tuesday, October 20, 2015

Kwik Sew 3334 Jacket restyle...


I've been watching one of my favorite RTW jackets decline over the last couple years. It's a red ponte made by Motto and purchased from QVC back when its Motto line was extensive and edgy - I love it. But the red has faded with washings, and the buttonholes are stretched out. Sadness. So I decided to take measurements and pics before it leaves me - and to work on a copycat pattern. 

The original...


I started by looking for a jacket or blouse to use as the foundation for the bodice. Something with a similar neckline, wide-set and low. Enter Kwik Sew 3334, which came out in 2005 and has a lot of helpful reviews on Pattern Review (thank you, fellow sewists!).


I made only a few adjustments to the pattern, all on the tissue before cutting fabric. I'm so brave...but I was using 2 yards of Maggy London ponte de roma that I snagged at $1.99/yard from FabricMart earlier this year. And the pattern can always be replaced. Changes:

  • Removed the dart from the sleeve (I just don't care for the fit of a darted sleeve in a casual jacket).
  • Straightened the side seams from armscye to the bottom of the bodice.
  • And cut the bodice 5" below the armscye.
At first, I thought I'd use the notched collar, but after giving it some thought, I decided to go with the shawl collar. Honestly, I thought the notch points might not turn and sit well, given the weight of the ponte. 

As it turned out, I love the shawl collar - it's beautiful. 


Drafting the skirt part was easy - two fronts and a back, cut as rectangles, with an allowance for a generous facing on the fronts and a deep hem. Rather than use the pleats on the skirt, as on the original, I gathered the fabric under the princess seams and  the back darts.


I also decided to use elbow length sleeves, mostly to balance all that black fabric. With the full-length sleeve, the jacket was dressy and kind of funerary.


I already knew that the buttonholes in ponte might be a continuing issue, so I did some tests to confirm. Below, the original and my results. Aack!


Button snaps were a great solution, and an excuse to use my gigantic snap tool again :-) I also like the balance of the snapsets on each side - they definitely raise the casualness factor of the jacket. I didn't plan any of this beforehand, it just worked out well.


Final measurements - the bodice/skirt seam is 3 1/4" below the armscye, and the skirt is finished 18" below that seam.  


I like it! and have already worn it out and about a couple times. It's super easy to throw on over pants and a tee. I'm planning to do it again in a fun color, orange or marigold, with a gathered and cuffed sleeve. 

Parting shots from the garden:

I have a new plant, one that simply appeared in a couple places over the last couple months. I thought it was a sansevieria and was happy to have it. I love it when a plant volunteers in the garden, brought by birds, the wind, or who knows...


But a few days ago I noticed one of them had bloomed, and the flower did not look like a sansevieria at all. After an hour of research online, guess what - it's a terrestrial orchid! Check out these tiny little monkey-face flowers. They're pollinated by ants and rain.

Oeceoclades maculata, aka Monk Orchid, Aftrican Spotted Orchid

It has a fascinating history, with origins in west Africa and emergence in Brazil and the Caribbean in the 1800's. Apparently it began showing up in south Florida in the mid-1970's, possibly as an escapee from Fairchild Gardens in Miami-Dade. 

So now I dare anyone to walk on one of them! Or worse, pull it up as a weed. 

Bye for now! Coco

Friday, September 18, 2015

Kwik Sew 2895 Denim Jacket - a second look


Levi's jacket from the 80's


Time to revisit a classic pattern, the good old jean jacket. It gets done in many ways, but I really admire the original Levi jacket - all those seams, welt and flap pockets, topstitching, brand buttons, orange/red button holes - what a  great look.

Here's the thing - I doubt that it's possible to make a convincing knockoff of the Levi classic. Maybe I should say it's not practical - it's sewn on industrial machines with fabric that's been treated in special ways, and with thread that we just can't source easily.

Solution? Buy one! I have a couple and love them. But I also like to fool around with sewing one. The leftover lightweight denim I used for my Strides trousers kind of stared at me and said 'jacket'. Time to pull out Kwik Sew 2895...


It's an easy pattern: the pieces fit together well, the instructions are great, and the collar is very cooperative. It has 36 reviews on Pattern Review! and seems a popular choice with sewists of many levels of experience. I sure like it.


It is really hard to photograph this fabric! A few sewing notes:

  • I made a muslin 2 years ago in white denim. And never wore it - it was a little snug on me. For this one, I stayed with the size Medium, but straightened the side seam from armscye to waistband, an increase of about 2" in the waist. The resulting relaxed bodice is much easier to wear.
  • I extended the cuff band to form a button tab. 
  • Because the collar does not have a collar stand, I added facings to the front and back neckline. I just don't like 'fold under and hand stitch' finish that's often suggested for this type of collar - it's messy.
  • And I got out the big snap tool and used antique brass button snaps instead of buttons. 


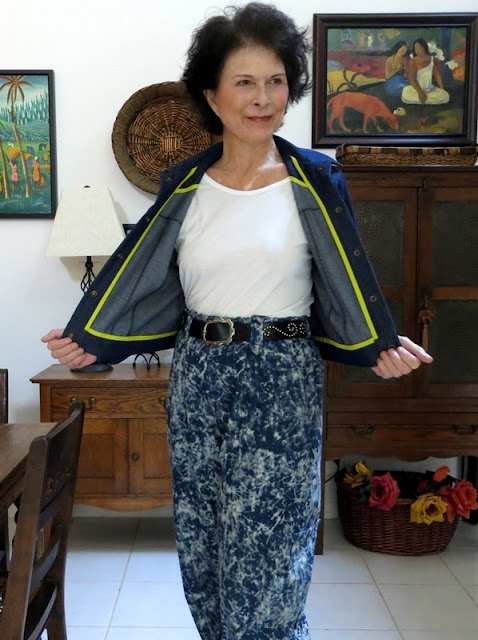
Fun with the inside, in wasabi green kona cotton. 


Here's that Pres-n-Snap tool, which I ordered from Sailrite a couple years ago. Kind of a splurge, but I love it. Because it's levered, I can close it easily, it's not at all hard to do. The 15 mm snaps are from Pacific Trimmings, a totally fun online store.


A note about denim: it ravels famously, in any weight, and it has a lot of bias stretch, even without any lycra. The first thing I did was to serge the edges on all my pattern pieces and staystitch any curves that might stretch out.

Now, about those britches - these are favorites, made with McCalls' 6291 cargo pants pattern in a tie-dye denim from JoAnns. I've worn this pair a few times on the blog, but I've never mentioned them specifically. The cargo pockets on the legs don't show in this pic, but they are there, no button flap. And the hem is plain, no elastic cuff.

Kirsten Kimono tee with 9" added to the sleeve


These pants are easy to make and easy to wear, with an elastic sewn-on waist that doesn't bunch up a lot. My very first version here...


And it's time for a fresh cup of coffee. I'm headed up to the loft, where I have a pair of purple pants in progress :-) Hope everyone enjoys a nice weekend.

Ciao! Coco
Wednesday, July 30, 2014

Kwik Sew 4015 - A Kaylee Chinese brocade jacket for Cosplay!


So pretty - Ashley's brocade jacket for her Kaylee Firefly costume. And my first experience with Chinese brocade fabric. Interesting to say the least!

 Kaylee, of Serenity and Firefly fame, wears a Chinese brocade jacket over her mechanics overalls. Don't we all?

Finding a pattern with just the right collar and attitude was not easy! It seemed like all the patterns I found had frog closures and were either very boxy or very fitted. Aargh.

I finally came across Kwik Sew 4015. It's not perfect, but at least it has the basic elements - a buttoned closure, reasonable seamlines, and a kind-of mandarin collar.


Yes, I made a muslin! And fortunately, I have Lizzy, Ashley's dressform, in my sewing loft.

First pattern change:  the collar. On the original pattern, the collar ends at the front edge. For Ashley's jacket, I cut the collar shorter and reshaped it to be like Kaylee's.

Covered buttons!

Next change: no side slits or lining. The original pattern has curved sides, is fully lined, and is finished with bias binding. It's actually reversible. But Chinese brocade is heavy. I don't want the girl to expire inside her costume!

Cutting the body without slits was easy. To replace the lining, I drafted facings for the back neckline and fronts. I also faced the cuffs, to reduce wear on the fabric. The facing is poly/cotton Symphony broadcloth from JoAnns.


Isn't the inside of the brocade beautiful? About this fabric - it ravels if you look at it. Honestly, you can lose 1/4" of an edge just by picking it up. The first thing I did was serge every single edge of the cut fabric pieces. I did this with my cutter up, just skimming the edge so that any existing ravels were cut off, not bound inside the serging.

Other than the ravels, the fabric was nice to sew. Topstitiching would have been a lot easier if I had remembered to take my walking foot with me to Ashley's house!

Pressing - I practice ironing fabric the same way I practice sewing it, using scraps. This polyester brocade is a little picky. I used light steam, but with a pressing cloth, and I only pressed. Any movement of the iron tended to warp the fabric. It doesn't take a hard crease, but it also doesn't really wrinkle.

The jacket is beautiful - but I must give some credit to Callisto, who helped me so much with the pattern layout process...


Well done. Ciao! Coco