Monday, February 22, 2016

It's doll season...redux

 
Bringing back this post with a rewrite - more upbeat because I'm feeling better and sewing more :-) I get very uncomfortable with myself when I get distracted and then write about it. I don't want to read it - it means I need a good shake! So...

------------------------------------------------------

Around mid-February, I decided to vary my craft work a bit and work on my art dolls, something I haven't done for a couple years.  I love fabric art dolls, and I'm very humbled by the incredibly talented doll artists out there (you can google art dolls to see some - they're amazing). My favorites, and a continuing source of inspiration, are Julie McCullough and Patti Medaris Culea.

Cecilia - a Summer doll


My own doll journey began about ten years ago, when I succumbed to a fabric doll in a small shop in Paris. I was enchanted - of course I had to try to sew my own.

Eventually I developed four 'signature' dolls, and I made dozens of them.

The most articulated dolls I've designed are the ones I call my Summer Dolls. At 18" tall, they have cute figures, limbs that are jointed with wood beads, wired fingers and hands, and ears! Since they're Florida girls, they wear sandals, little bloomers, and sundresses.


This go-round, I'm working on a couple new dolls. I've been intrigued by the Tilda dolls, designed by Tone Finnanger - they're somewhat primitive and very appealing. So I've been sketching patterns, sewing, stuffing, and discarding (it's a process).

Here's my first version - she's about 16.5" tall and has simple grey curls.

Cute, but I want to joint her arms and legs, so still in progress.

The next girl, from the first photo, is fairly tall at 20" and has experimental hands and feet. I like her feet, because they will handles shoes and sandals, even toe nail polish once I shape the toes. But I don't care for her hands. I make 20" dolls quite often, so she's a good fit model, and her arms don't really matter. Purpose-built!


I'm also refining my Summer Doll, slimming her limbs and improving her joints and hands. I've been studying hand construction and technique for fabric dolls, so this is quite fun. All her parts...


Those little hands are about 2" long, wrist to fingertip - the thumb is only 1/2" long - and they're articulated with pipe cleaners. 

Plans for today include putting her together while watching 'House' and the Indian Wells tennis tournament on TV.  Retirement is so demanding. 

At the age of 3, my niece complained to her mom, 'you make me so busy' - we were all laughing like crazy...

Ciao! Coco

Saturday, February 13, 2016

Working the faux Mociun tie-front dress...


Version by Lela Rose, $800
Mociun original, $350


Apparently I missed out on all the Mociun dress commotion of about 5 - 6 years ago. I wasn't blogging then, and I definitely was not spending $250 or more on a casual dress!

But earlier this week I just happened to see a bevy of real and faux Mociun's on Pinterest, including some made by sewing bloggers. Wow. I like this design.


So - off to my patterns to see what might work as a starting point for that bodice. I decided to use the Kwik Sew 3782 pussy-bow blouse. It has sleeves (which I want) and a v-neck with a tie.


This was a pretty easy alteration, I just had to think it through and keep track of my changes.
  • The sleeves were the easiest part! I straightened the underarm by dropping the seam line straight down from the armhole.
  • Shortened the bodice by about 2 1/2" above the natural waist marking on the pattern.
  • Narrowed the bodice quite a bit, to end up with 39" across the bust and 35" at the lower edge.
  • Fashioned the bodice front with a 3" opening at the lower edge, to allow for knotting the tie fairly tightly across the bust. I've seen other versions that left the 3" opening in the skirt instead of the bodice. But this approach works really well and doesn't hike up the skirt in front when it's tied.  


Finishing the lower bodice at center front - a 1/2" SA, folded under twice and topstitched.

  • The tie is 2 pieces, 8" wide by a yard long, cut on the bias and sewn together. Eventually I shortened it quite a bit. On this version, the tie is 11 1/2" long from the point at which it exits the bodice. And I might shorten it again by an inch or so.


  • The skirt is two rectangles, 27" wide by 31" long, gathered and attached to the bodice. I crossed the bottom of the bodice by 1/4", before attaching the skirt.
  • And put side seam pockets in the skirt, about 5" below the top edge.

There's only light gathering of the skirt under the center front, to decrease bunching when the dress is tied.


This cotton fabric is from Holly Lobby - and it drove me a little batty, because it had a persistent twist in it. Matching the print at the seams was harder than it should be. But - this version is a muslin, so I lightened up. I do like the print, though, and plan to get something similar from somewhere else!


I've also decided to take a couple inches off the hem on my next one.


This was a pleasant little project, and it kept me out of trouble for a week :-) 

Hope you're having a nice weekend - Coco

Monday, February 8, 2016

Grainline Studio Lark Tee - Cardigan version!


Cascade, waterfall - all those beautiful coats that have been popping up make me so jealous of people who actually have seasons. I want one! red or camel or black. With a scarf and gloves and slouchy knit hat. Can't have everything, so I made a waterfall cardigan.

The Lark Tee


And I got so much help.

I've been lurking the Grainline Studio Lark Tee. It comes with four necklines - scoop, vee, crew, and boat neck. But it's a tee. How many tee shirt patterns do I need?

Apparently one more :-) I convinced myself when I read Jen's (free) tutorial on making a cardigan with the crew neck version of the Lark. I even had suitable fabric at hand, a Maggy London cotton/poly/lycra stripe from Fabric Mart. It's been hanging out in my stash since last May, because the stripe is simply too small for a dress. But this cardigan is perfect - I had to buy the pattern.


Here's Jen wearing her version:

Source 


The Lark Tee is long at 28" or so, which I like since I don't tuck my tops. For her cardigan, Jen took 2.5" off the length of the tee. And I added 3" to mine, because I like to cover my bum.
 

Here's a look at the very simple redrafting of the crew neck pattern:

Source

In typical Grainline Studio style, both the instruction booklet that comes with the Lark, and the tutorial for the cardigan, are beautifully done with clear illustrations and understandable directions.

I pretty much followed the directions, but I ran into difficulty when it came to hemming the neckline and front. The instructions are to turn in the edge 3/4" and topstitch/coverstitch to finish. Aaack! A raw edge inside that would show outside in the cascade. Worse - I simply could not get the fabric to turn in 3/4" around the tight curve at the shoulder seam/back neckline area.

So I fooled around with some scrap fabric, trying for a rolled hem finish. It was OK - but not the nice finish I like.

Finally my coffee kicked in (it was early this morning), and I remembered TwoToast's Sunday blog post  in which  she describes how she finished the edges of her new cascade cardi. Lightbulb moment - what a great approach! I cut 1.5" wide strips of rayon jersey, folded them in half wrong sides together, and attached them to the cardigan, pretty much the same way one would attach a band to a neckline. A little topstitching to keep the bands from rolling out, and done.

It's a little hard to see on black, but here's the outside and inside of part of the band. I really like the way this looks:
 

One note of caution: the sleeves are straight from the tee shirt pattern, so they are slim. I'm wearing a sleeveless Bantam vest under my cardi - I really couldn't get it over a long-sleeved tee very comfortably. It would be easy, though, to widen the sleeve. Also, I sewed the size 10, which matches my measurements. I always cringe mentally when I go down a size, but the pattern is true to its size charts.


I'm glad I made this, it's pretty neat. But I'm not sure it's the best look for me. Maybe with a turtleneck. Or long hair. Or a long necklace. (Or a scarf, mittens, and a knit cap :-) But I scratched my itch to have a waterfall coat, and I still have a wonderful tee shirt pattern to play with in the future. I have another two yards of this fabric, so I'm thinking a crew-neck tee with a cuffed sleeve.


Bye for now! Coco

Sunday, February 7, 2016

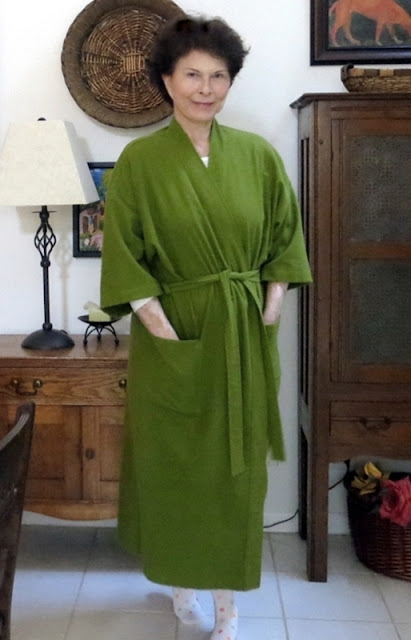
Simplicity 5314 - my TNT robe...


Oh gosh, it's been a little chilly here in Florida! I know a lot of you are laughing now - but 40 degrees F. is on the cool side for the sub-tropics. Time for a new robe, one of my favorite sewing projects. In the last four years, I've made 3 for my daughter, one for my grandson, one for Mom, and 4 for my greedy self.


I keep several kimono-style robes on a hook in the bathroom, a hooded purple fleece robe from Long Tall Sally in the bedroom (my splurge robe), and a long black one, made in 2013, near the front door.

The black one, which I fashioned after the iconic Calvin Klein knit robe, is for answering the door, getting the mail, putting out the trash bins. I want my neighbors to think I dress like this all the time, instead of in mismatched pj's and knee socks.

A note: I collect knee socks. All kinds of patterns and stripes. I find them irresistible.


Back to the robe: My TNT kimono pattern is Simplicity 5314, a unisex collection of PJ bottoms and robes. These are great basic patterns and include sizes S through the rare XXXL. At 5'7" and size 10-12 in Big 4 patterns, I wear the Small.


The one thing I always change on the robe is the pockets. I use great big patch pockets instead of the smaller inseam variety in the pattern.

Fabric - Calla Green Cozy Flannel, JoAnns

I start the pocket with a 10" x 9" rectangle, and end up with something around 8" square. And I attach the outside edge of the pocket in the side seam, about 3.5" below the belt loop.

Basted and ready to be topstitched.

If I attach the pocket with a single line of topstitching, I run a notch of reinforcement stitches in the upper corner.


Which reminds me of a question asked often on PR - should hidden seam allowances be finished? My vote: yes. For instance, flannel is very loosely woven and ravels in an instant with handling. If left unfinished, the insides of these pockets wouldn't hold up well with use and laundering. So I serged all the inside edges of the pockets before I sewed them. Takes about 5 seconds.


The big reveal - yes, I have legs, but they're not often seen given my penchant for maxi's and pants :-)


I had just enough left-over fabric to make a pair of PJ shorts, also in size Small. I love them! The fit is great, and they're super easy and fast to make.


Parting shot: I'm still knitting socks (soon to be blogged). A peek at the only two matching socks so far. Tube socks of course!


Ciao! Coco

Thursday, February 4, 2016

A Valentine's Day dress...


I love February! It's such a sweet month, and the last day (3 out of 4 years) is my birthday. So I try to make a suitable something every year.

Anticipating this year's make, I picked up Girl Charlee's 'LOVE' knit jersey during the Thanksgiving sales. It comes in a white/red colorway as well, but I really like this gray/black combo. More subtle, if that's possible with this print - and it's very playful.


I've worn it twice already this month and received nice comments each time. The dress is my version of the Dixie DIY Ballet Dress, i.e., the top from the pattern and a length of fabric for the skirt. Lazy me, but the width of a most knit fabrics work great for my skirt without any shaping.


The neckline binding is black rayon jersey - I thought it would look strangely speckled if done in the main fabric.


This cotton/poly fabric, which is branded under Girl Charlee's own name, is light to mid-weight (7.5 - 8 oz.) and is easy to sew and wear. It has a nice amount of width-wise stretch without being 'spongy' or clingy.

A couple sewing notes:

I just can't wear the elastane tape  that is often recommended to support shoulder and waistline seams. For the waistline on a casual garment, I usually sew the seam with a lightning stitch, serge/cut the allowances together, press them up, and topstitch them to the bodice. That waistline is not going anywhere...

Waistline seam, inside view
 
I like to serge/cut my armhole seams together, and then let the fabric tell me what to do with the seam. On this dress, I pressed the seam in, towards the bodice, and topstitched it. Some fabrics want to go the other way, towards the sleeve.

Armhole seam, inside view

There's a recurring discussion of the 'which direction for seams' question on Pattern Review, and not just for sleeves, but for any seam. I go with the flow unless there's a compelling design reason to use a particular approach.

Because when the garment is laundered, the seams are going to tend to their natural placement...most of my garments wave goodbye to the iron once I've finished sewing them :-)


Fun project. But now I'm stuck. I've had three serious wadders already this year, all with new patterns. And I've no idea what I want to do next.

This happens once in a while, so I'm knitting while I wait for that lightning bolt moment. I decided to learn how to knit socks. Those skinny double-point needles have always intimidated me - but I've done 7 socks now, none of which are matching, and I'm getting good at it!

Bye for now - Coco