Showing posts with label Coats. Show all posts

Friday, December 9, 2016

Time for a knit duster ...


Who can resist a fun unstructured duster when the weather turns cool...

Not I! I've spent hours in the past few weeks, just cruising duster patterns and lots of wonderful makes by sewists in the blogosphere.

Irresistible. I especially like the new Berlin Jacket by Tessuti and the Esme Maxi Cardigan by Named Clothing.

But I didn't particularly want to invest in a new pattern. Trawling through my stash, I pulled out an oldie but goodie, the Heading for Adventure coat by Louise Cutting.

I made it in linen way back in 2010, but it was very large on me, even thought I sewed the size Small. And the linen really bugged my skin - I never wore it.


Nonetheless, the design details are so appealing. I love the piecing and topstitching. And Cutting's techniques, which are beautifully articulated in the pattern instructions, are incredible.
 

It was a great starting place. But I wanted to go with the lines of the dusters I mentioned above - a softer neckline, an attached band, and slim-ish sleeves. And I wanted to use a knit fabric - a very lightweight rayon/spandex French terry that I purchased recently from Fabric.com. 

I was impatient to do all the re-drafting at one go, but I decided to be cautious. I actually sewed this in three steps. First, I cut out and sewed the entire coat from the Cutting pattern, using the size XSmall this time. And then I changed it, using the Jalie Cocoon Cardigan to redraw the neckline and draft an attached band, 


and the Grainline Studio Driftless Cardigan to alter the sleeves (I removed almost 6" from the width at the upper arm - the sleeve was voluminous). 


This sounds like a lot of tweaking, but it was not difficult, because the Cutting coat is all right angles. It was easy to lay it out and draw on it with chalk.

Time for pics (this gray is hard to photograph - it almost shimmers here. Squint, please)...


I love the back drawstring! It looks very similar to the back of the StyleArc Winsome Designer Dress (posted here), but the construction is not the same, due to the placement of other pieces in the back.


The patch pockets are very over-sized and long. Fun! 


I'm off to JoAnns now, to get supplies for Christmas gifts. And I have to remember to tell my kids to stay off my blog for a couple weeks :-) Check out this adorable cat house from SeeKateSew! My weekend project...


Hope everyone enjoys a safe weekend, with lots of sewing therapy time...bye for now, Coco
Friday, September 18, 2015

Kwik Sew 2895 Denim Jacket - a second look


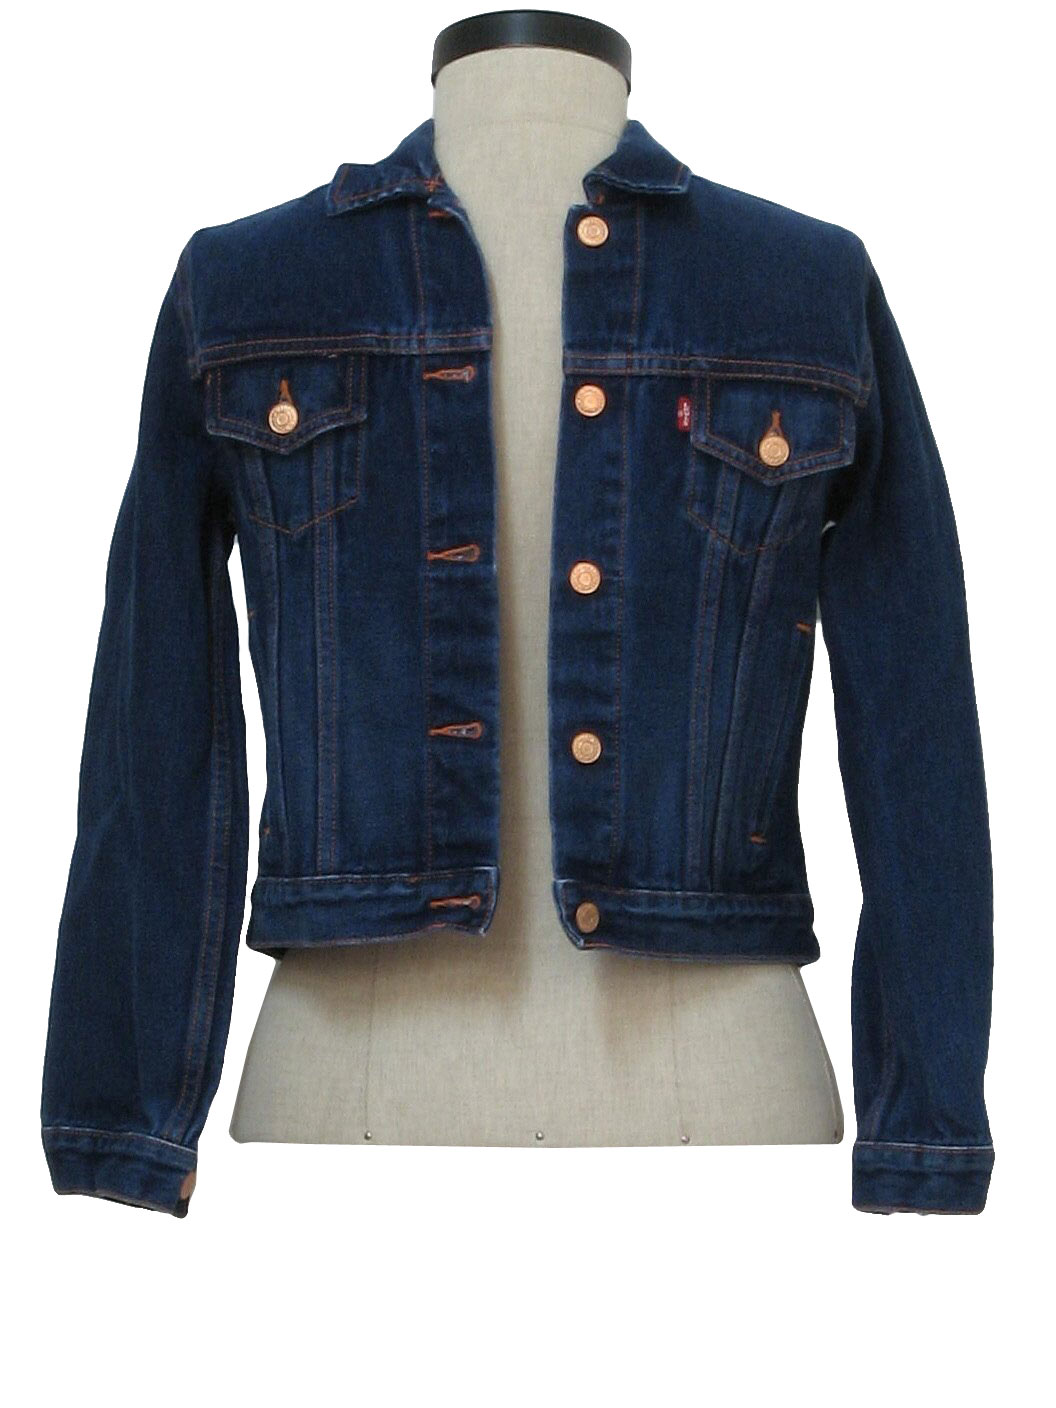
Levi's jacket from the 80's


Time to revisit a classic pattern, the good old jean jacket. It gets done in many ways, but I really admire the original Levi jacket - all those seams, welt and flap pockets, topstitching, brand buttons, orange/red button holes - what a  great look.

Here's the thing - I doubt that it's possible to make a convincing knockoff of the Levi classic. Maybe I should say it's not practical - it's sewn on industrial machines with fabric that's been treated in special ways, and with thread that we just can't source easily.

Solution? Buy one! I have a couple and love them. But I also like to fool around with sewing one. The leftover lightweight denim I used for my Strides trousers kind of stared at me and said 'jacket'. Time to pull out Kwik Sew 2895...


It's an easy pattern: the pieces fit together well, the instructions are great, and the collar is very cooperative. It has 36 reviews on Pattern Review! and seems a popular choice with sewists of many levels of experience. I sure like it.


It is really hard to photograph this fabric! A few sewing notes:

  • I made a muslin 2 years ago in white denim. And never wore it - it was a little snug on me. For this one, I stayed with the size Medium, but straightened the side seam from armscye to waistband, an increase of about 2" in the waist. The resulting relaxed bodice is much easier to wear.
  • I extended the cuff band to form a button tab. 
  • Because the collar does not have a collar stand, I added facings to the front and back neckline. I just don't like 'fold under and hand stitch' finish that's often suggested for this type of collar - it's messy.
  • And I got out the big snap tool and used antique brass button snaps instead of buttons. 


Fun with the inside, in wasabi green kona cotton. 


Here's that Pres-n-Snap tool, which I ordered from Sailrite a couple years ago. Kind of a splurge, but I love it. Because it's levered, I can close it easily, it's not at all hard to do. The 15 mm snaps are from Pacific Trimmings, a totally fun online store.


A note about denim: it ravels famously, in any weight, and it has a lot of bias stretch, even without any lycra. The first thing I did was to serge the edges on all my pattern pieces and staystitch any curves that might stretch out.

Now, about those britches - these are favorites, made with McCalls' 6291 cargo pants pattern in a tie-dye denim from JoAnns. I've worn this pair a few times on the blog, but I've never mentioned them specifically. The cargo pockets on the legs don't show in this pic, but they are there, no button flap. And the hem is plain, no elastic cuff.

Kirsten Kimono tee with 9" added to the sleeve


These pants are easy to make and easy to wear, with an elastic sewn-on waist that doesn't bunch up a lot. My very first version here...


And it's time for a fresh cup of coffee. I'm headed up to the loft, where I have a pair of purple pants in progress :-) Hope everyone enjoys a nice weekend.

Ciao! Coco

Friday, May 22, 2015

Grainline Studio Morris Blazer - the muslin is back

Edited August 25: I'm so mercurial! Right after I posted this in May, I decided to sideline it. I don't even remember what bothered me about it - I think maybe the fabric made my eyes wiggle. 

Anyway...I'm putting it back in the mix, because I've just cut out another Morris, for real this time, and I know it's nice to see what went into a muslin. 

Coco
-------------------------------------------


The latest from Jen at Grainline Studio - a casual little blazer for wovens and stable knits. I had to give it a try. Jen's designs are so fresh, and her patterns are such a pleasure.


I wasn't sure that I really liked the front of the jacket, so a muslin was in order. I managed to cut all the main pieces from scraps of mid-weight (8 - 10 oz) cotton/lycra knit that I used for a maxi skirt. And I used mid-weight cotton/spandex jersey knit for my facings. The two fabrics work very well together and give this jacket a nice beefy feel without being heavy.

The main fabric I used is not the best choice, because it has 4-way stretch. A 2-way stretch would be so much easier to manage on these small pattern pieces.


There are now a lot of reviews of the blazer, and I'm so grateful for them. A number of sewists noted a tendency for the front fabric to sag in the area above the banded hem. The favored remedy seems to be topstitching along the front facing edge to stabilize the fabric. Hmmm. My knit fabric would only make it worse - so I decided to tweak the front in hopes of circumventing that sagging.

Basically I redrafted the dipped point in the hem, moving it back and up.


And I'm happy with the result.  In the end, I also topstitched along the facing line (more below), but primarily to keep the facing in place.

Some pics on Emile:


Other sewing notes:
  • I cut a straight size 12.
  • When I basted in the sleeves, the seams were a little low off my shoulder. Easily fixed with a small redraft of the upper half of  the armscye. I might not need this adjustment with a woven fabric, so I didn't transfer this change to my tissue.
  • No sleeve facing - I overlocked the sleeve edges, turned them up 1", and simply topstitched them to finish.
  • The rest of the topstitching -  I didn't topstitch the outside edge of the collar and front, because I wanted to keep the fold of the lapel very soft. And as noted, I topstitched along the lines of the front facing.


I didn't even have to lengthen this jacket! Love the length.


This was an interesting project, but I'm not sure I'll sew it again. There are so many jacket patterns that I like more than this one.


Hope everyone has a nice and safe weekend - Coco

Wednesday, November 5, 2014

Burda Style Athletic/Bomber Jacket!


Gosh, it seems like forever since I posted.  I just haven't been well. Short hospital stay the first week of October, and it has taken a while to get back on my feet. Aargh.

When I came home, Ashley and D. 'moved' the loft downstairs into the dining area, and I've actually enjoyed a little sewing. And today Emile took on some modeling for me.

This bomber jacket is so cute - Burda Style calls it an athletic jacket, maybe because the sleeve is not set-in. I've been wanting to sew one for months, but just couldn't settle on a pattern.

Burda Style 05/2014 #110

I finally chose this pattern, out of the many out there, for a couple reasons: it's unlined, and it has a round neck with no ribbing. I think the ribbing on my neck would make me crazy :-)


I also thought I might be able to adapt the band on this pattern for a button band, since I don't use zippers. In the end, I just redrafted the front edge:

  • I extended the front and front self-facing by 1.5" to form the button band area. 
  • And added the 'classic' button square at the ends of the waistband ribbing.


Another change I made...I ended up using faux welt pockets. I originally sewed in the pocket bags, but didn't like them. So chop chop!


Inside views..

I used a corded denim, which is a little stiff at this point after only one washing. It's a little ravelly, so all the seams are serged or bound.


Loving these button snaps...


Behind every good button snap there's a good tool, and believe me, this one is worth every nickel it cost me. It does all the work - I'm so excited to have this hunk of metal! Many many thanks to Anne, at Clothing Engineer, who has a wonderful review and tutorial on the use of this fantastic tool.


Pres-n-Snap, from Sailrite
15mm ring snaps, Pacific Trimming

I'm going to put snap buttons on everything!!

One last sewing note. I didn't go for ribbing - I used remnant cotton/spandex jersey knit for my cuffs and waistband - works like a charm. 

This was an interesting project, but it turns out that this grey jacket doesn't match anything in my wardrobe! So funny...

Ciao! Coco

Wednesday, July 30, 2014

Kwik Sew 4015 - A Kaylee Chinese brocade jacket for Cosplay!


So pretty - Ashley's brocade jacket for her Kaylee Firefly costume. And my first experience with Chinese brocade fabric. Interesting to say the least!

 Kaylee, of Serenity and Firefly fame, wears a Chinese brocade jacket over her mechanics overalls. Don't we all?

Finding a pattern with just the right collar and attitude was not easy! It seemed like all the patterns I found had frog closures and were either very boxy or very fitted. Aargh.

I finally came across Kwik Sew 4015. It's not perfect, but at least it has the basic elements - a buttoned closure, reasonable seamlines, and a kind-of mandarin collar.


Yes, I made a muslin! And fortunately, I have Lizzy, Ashley's dressform, in my sewing loft.

First pattern change:  the collar. On the original pattern, the collar ends at the front edge. For Ashley's jacket, I cut the collar shorter and reshaped it to be like Kaylee's.

Covered buttons!

Next change: no side slits or lining. The original pattern has curved sides, is fully lined, and is finished with bias binding. It's actually reversible. But Chinese brocade is heavy. I don't want the girl to expire inside her costume!

Cutting the body without slits was easy. To replace the lining, I drafted facings for the back neckline and fronts. I also faced the cuffs, to reduce wear on the fabric. The facing is poly/cotton Symphony broadcloth from JoAnns.


Isn't the inside of the brocade beautiful? About this fabric - it ravels if you look at it. Honestly, you can lose 1/4" of an edge just by picking it up. The first thing I did was serge every single edge of the cut fabric pieces. I did this with my cutter up, just skimming the edge so that any existing ravels were cut off, not bound inside the serging.

Other than the ravels, the fabric was nice to sew. Topstitiching would have been a lot easier if I had remembered to take my walking foot with me to Ashley's house!

Pressing - I practice ironing fabric the same way I practice sewing it, using scraps. This polyester brocade is a little picky. I used light steam, but with a pressing cloth, and I only pressed. Any movement of the iron tended to warp the fabric. It doesn't take a hard crease, but it also doesn't really wrinkle.

The jacket is beautiful - but I must give some credit to Callisto, who helped me so much with the pattern layout process...


Well done. Ciao! Coco