Showing posts with label Merchant&Mills. Show all posts

Sunday, October 18, 2015

Finishing the Haremere jacket...stubborn


When last seen, my Merchant & Mills Haremere jacket was unfinished and declared a wadder. And it rested in the bin for a number of days. The problem was, my mind just couldn't leave it alone. I wanted to finish it. So I did.

I deconstructed the biggest problem area - the shoulders - and redid them. This meant (1) straightening the angle of the shoulder seam, and (2) trimming and fitting the upper armscye to raise the sleeve.

It wasn't awful, surely not the hardest fix I've ever done. And once accomplished, I moved on with the balance of the jacket.


Because the original 4-layer back facing was simply two thick to work well in my neckline seam, I drafted a much more  simple facing that went in nicely.


It meets the binding on the jacket lapel at the shoulder, and is topstitched along the bottom edge to keep it from flying up (with red thread in the needle and navy in the bobbin).


Next up were the sleeves, which went in with no issues. I bound the edge of the sleeve hem, rather use a lining or facing - just personal preference. And I finished binding and blind-stitching the back hem in place.


At this point, the jacket was looking pretty cute, and I was glad I'd decided to finish it.


Last thing - I put on the front pockets. In general, I don't use the pocket placement markings provided with patterns, because I want them to go where they work best for my hands!


And so ends the Haremere marathon. Will I make it again? Well, honestly, having done all this drafting and redrafting work - maybe, but not soon :-)

Ciao! Coco

Thursday, October 1, 2015

Merchant & Mills Workbook - the Haremere Jacket


Some things are just not meant to be...

I've spent several days working on the Haremere jacket. Gosh, what a mess. And I give up. Got other things to do.

I really like the concept: an oversized boyfriend jacket, or a coat with added length. Big patch pockets. A shawl collar and 2 buttons. But I've had issues with the drafting and with fitting a couple critical points.


My biggest challenge was with the shoulders. The shoulder seam is a long curve, up and away from the neckline, then back down to the dropped armscye.


The arrow in the pic below is pointing to my natural shoulder - that's some drop. My dressform Emile has slightly sloped shoulders, while mine are straight across. It kind of fits on Emile.


However, when I tried it on, with the sides open, I could see I had a problem. The shoulder seam bubbled up, and when it came back down to earth, it actually cupped the top of my arms. So I basted all the side seams and put it on again to verify. Wow, too much curve in the shoulder seam, and the armscye is tiny. I could hardly raise my arms. There's just no give - maybe this is meant to be worn with one's arms down. Down, I say, no hands in the air!


Aargh. I fiddled with the shoulder seam last night and again this morning. Flattened it out and adjusted for my sloping right shoulder. My seam ripper got a workout, but the result was better across my shoulders. But to be able to raise my arms, I had to trim the armscye a bunch - about 2 inches at the shoulder seam, cured down the front and back.

I'm surprised my fabric, which is a lightweight denim, did not just fall apart at the shoulder/back neckline pivot point after being re-sewn about a million times. I went ahead and added the back lining, which is sewn into the neckline and shoulder seams. The neckline ends up with 7 layers in the seam. Just not pretty, and at this point I really didn't like this jacket at all.

And the loft was not pretty either! Here's how it looked before I chucked the jacket, the pattern, and all vestiges of the same (except my Workbook) into the bin.


I don't want to be a naysayer - I've seen several really attractive versions of this jacket. Everyone is shaped differently. It just doesn't suit me.

Things I do like about the pattern:

The front facing, with it's curved bottom and finished edge, is very pretty.


The Workbook uses a bound finish on the facing, but I used a Hong Kong finish, to reduce bulk. And I think it's prettier.


Stitching in the ditch, Hong Kong finish

The pockets are also nicely drafted. They have a full lining, which hides all the trimming and clipping that's necessary to achieve a clean and symmetric curved line at the bottom.


End of the Haremere tale. 

I'm off to cut out a Jalie cocoon sweater. I did a muslin last week, and I've decided to go for it in a navy knit crepe. Turner Classic Movies is showing Walter Matthau films this morning. Perfect.

Bye for now - Coco

Wednesday, September 23, 2015

Merchant & Mills - the Bantam Vest


Front

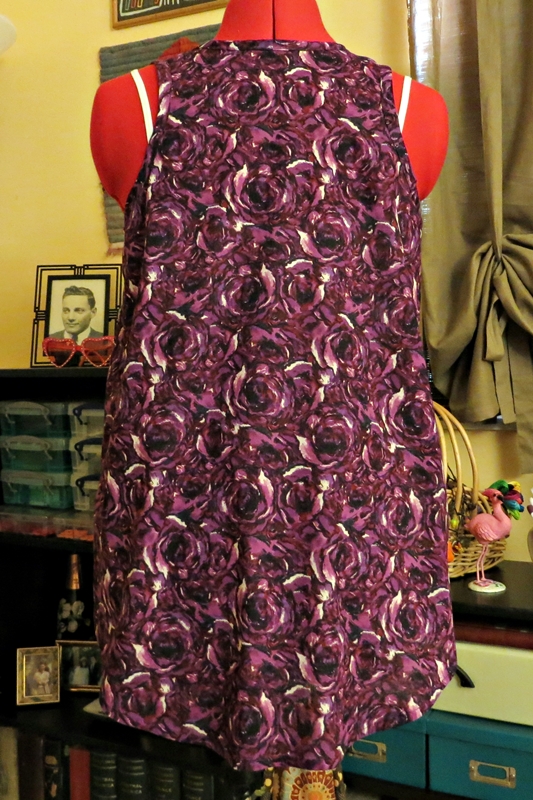
Time for more from the Merchant & Mills Workbook - the Bantam Vest. I love it!

It's such a simple pattern, just two pieces plus binding (or not). I think M&M really got the lines right on this one. String vests are not just for men! This one, for women, has such fun details: a curved hem, which drops in the back, nice deep armholes, and a racerback that fits just right across our angel wings.


Emile is my photo model today, since my post-surgery arms are not yet allowed to go flying over my head. The white straps are from Emile's camisole, so you can see pretty much where lingerie straps would fall. IMHO, a matching cami strap would be cute - I'll do it!

Back

I love the curve at the side of the hem and the back dip.


Side

This one is done in cotton lawn from Fashion Fabric Club. I'm crazy for this print. Lawn is perfect for this pattern - M&M uses a lot of lightweight linen, but I find it to be very scratchy, no matter how often it's washed. Other choices might be voile and challis, both of which would drape more than lawn or linen.

The binding...hard to see, but it's there. I don't use pattern pieces provided for bindings. Whether they fit really depends on the fabric - how could one pattern address all those possibilities. So years ago I taught myself to make long strips of binding (bias for wovens, across the stretch for knits) and attach them by fit and feel around the various curves on a garment. I generally start at CB and work all the way around, no pinning. All I can say is, it's fast, dependable, and not frustrating! I'm really glad I learned how to do this, since I seldom use facings on dresses or tops.


So, how to stop at one Bantam - can't do it! Here's a version in an unusual knit that I got ages ago from Fabric.com. My notes describe it as Florence nylon crushed jersey knit. It's very light, tissue weight, with horizontal slubs and heat-set crinkles. It has absolutely no vertical stretch, but about 30% horizontal stretch. 

I've avoided using it because it seemed a little scary! But it's perfect for the Bantam.

Front

I have the same fabric in off-white. Maybe I'll do another vest to wear layered under this orange one - it would be fun. 

Side
I tried doing hemming the bottom, but it just curled up. So I removed the stitching and ran a small straight stitch all way around, about 1/2" from the edge. Works fine, since jersey doesn't run, unless one really gives it a good yank. 

Back

I used French seams on both versions, and using them on a knit was a first for me. But they worked surprising well on this thin fabric.  I didn't apply binding on this one, I just turned the armhole and neck edges in 1/4", two times, and topstitched. The result is much slimmer straps.


One thing I didn't do was iron any part of this version! I tested a fabric scrap with the iron, and all the crinkles disappeared - completely flattened the knit. OK, so it's really wash & wear!


A few sewing notes:

  • I sewed the size 12.
  • M&M doesn't call their seaming technique a French seam - but it is. However, they suggest sewing it with half of the 5/8" SA in each of the two seam components. I really don't recommend that approach. IMHO, using 1/4" on the RS pass, and 3/8" on the WS pass, results in a nicer finish. 
  • Instead of using a French seam on the shoulders, I flat-felled them. This technique makes a nice, smooth, flat, and comfortable seam.
  • I took in the sides by 1/2" at each armhole, cured down 6".
  • And I redrafted the front hem a bit, to reduce what another blogger called the loin-cloth appearance. LOL - but it's true. I brought it up about 3/4" at CF, cured out in the curve on each side.
  • The lawn version used about 1.5 yards of 55" wide fabric. And the knit used only a yard!

Parting shot:

The anoles and lizards in my yard love to lay their little eggs in my hanging plants. The orchids, ferns, hoyas, and succulents. And Ms. Squirrel and the blue jays know it. A little feasting going on. Ms. Anole was caught looking a little unhappy with the situation...


Bye for now! Coco

Sunday, August 23, 2015

The last post ever about my Strides trousers!


Good morning! Well, I'm done with the Strides pattern...for now anyway. I spent hours taking them apart and resewing them strictly to the pattern, size 14. 


And they were simply too big for me. It's particularly evident in the front. Baggy gone baggier. 

I put the pants aside for all of one day, knitted, read, and then messed with them some more. Took off the waistband (again), cut 5/8" off the top edge of the pants all the way around, and took in a total of 3.5" at the waist: 1.5" on each side from the waist cured to just below the pocket, and the rest at the center back. I also redid the back seam to adjust for the bubble caused by the scoliosis curve in my right hip. And reattached the waistband. Whew. I think I should have started with the size 12.


The belt loops and front pleats are just pinned in this photo. And the fit is much better. But now I'm sick of these pants! 

Before I leave them, I should mention some of the nice aspects of the pattern. The zipper instructions are excellent, and the zipper facing and opposite seam are generous. The zipper can be set without the teeth peeking at all. I love the shape and utility of the buttoned fly shield, and the way the multi-piece pocket is drafted. 


I like to draft a tissue template to topstitch a front fly...I just sew over it and pull it off. No way am I going to free-hand that bottom curve!


And I use my open-toe presser foot to do the topstitching, because I can really see where I'm going. I use it to stitch-in-the-ditch as well, for the same reason. 


I added a few fun bits taken from men's trousers - bar tacks on the top and bottom of the pocket, and at the base of the front pleat. Actually, they really do make the pockets and pleats lay down better, in addition to securing these stress points during wearing. Squint a little bit and you'll see them...
 

All in all, I think I would like these better with two front pleats.  They're very wide in the front (the side seam is almost an inch to the back), and the single pleat looks a little lost. I pulled out Vogue 8836, which I've had for a while, and flat-measured it against the Strides. The Vogue pattern has two pleats and two back darts (the Strides have one), and it's more suited to my hip curve. The Strides are pretty straight in the hip - but then they're styled after men's trousers.

Vogue 8836


I'm not in a hurry to make more pants! I'm finishing a dress I'm making for Ashley (a surprise), and I'm working on her Boneyard Shawl once again. She and Darrin were able to snag an October reservation at their favorite B&B in Salem, Mass. The shawl will be fun for her in that witchy place of all things Halloween...

Bye for now - Coco

Monday, August 17, 2015

Redrafting the Merchant & Mills Strides...


Well, I'm still working on my Strides trousers. That bit of bagginess in the back is bugging me.

I started over this morning with new tissue, drawn directly from the M&M pattern, size 14. And I re-drafted the back with a couple of flat seat adjustments. Ha! I never thought I have a flat bum, but actually I qualify. Oh, pickles. Since when is aging a synonym for dropping :-)

So I did another muslin, and I'm so happy with the result. I'm cutting out a full-length pair of Strides in denim later today. There are a lot of changes, so I'm starting here...


First: the fish-eye dart. This is the same kind of dart that is often drawn vertically:


And can be drawn across one's pant to remove bagging at the bottom of the bum:


I used a wonderful set of pics/mini-tutorial from Ann Rowley to draft the dart.

Finished, the fish-eye looks like this. Absolutely no relation to a fish's eye. It's a slash-and-move technique that impacts the grainline, the waistline dart, the crotch line, and the tissue across the horizontal:


Having done that, I cut and sewed my muslin. And I discovered new things. My crotch was a little tight, where it had been loose before! No!! Whiskers are not welcome.

So I moved to my second change - this is also a flat seat adjustment, one I've used before.

I scooped out the crotch at the bottom. I decided to extend it just a little into my front crotch curve, because my front crotch almost pouched on my first Strides. It didn't show in the pics, but I could see it when I put on the pants. Just a little bit.

I didn't incorporate any of the changes I made on my first pair of Strides.


I've always wanted denim trousers. I think they are so cool. Like this inspiration pic from my Pinterest board - how fun are these!

Bye for now - Coco

Monday, August 10, 2015

Merchant & Mills Workbook - the Strides


What a delightful pattern! 

I had the best time with this project - all of it: muslin, fitting, sewing, tailoring, and, at last, wearing. I've always loved wearing trousers, and now I can make my own.


The pattern is marked for long pants and shorts. But I made this pair at a cropped length, with a finished out-seam of about 34". My fabric is a cotton/linen blend, and I don't want to worry over shrinkage in length. I cannot stand when long pants shrink above a useful length. And it's surely a liability with linen and cotton.

BTW, I made my muslin in the shorts length, in inexpensive broadcloth. After writing all over them during fitting, I tossed them. But they had lots of potential for very nice-looking walking shorts.


This was a four-day project. As others have noted, these pants are not a quick sew - they're fashioned after men's trousers, with all the implied detailing.

On the front:  A generous zipper and fly (a 7" zipper is used), two deep pleats, and slanted pockets.


I used 6 belt loops instead of 5 (I like the look and function of 2 loops at the center back). The pattern doesn't have back pockets - one could add them easily, but I don't put back pockets on my pants anyway. They bug me (except, of course, on jeans).


Front...


And back. And I'm very happy with the way the back fits.


I'm laughing now - I used two different belts in these pics, mostly because I wanted to see which one I like best. Since these are traditional trousers, the waistband is not over-wide. I fitted the belt loops to accept the widest belt I might use. It would be easy to redraft the waistband, if one wanted to use a wider belt. I think a wide belt would look nice on soft wool trousers, with a loafer-style shoe and a crisp white blouse. sigh. Sometimes I really miss having colder weather. 

Sewing notes - I did a lot of tailoring, starting with the size 14:

- On the back, I added a second dart to each side. 

- I made the deepest part of back crotch curve a little more shallow, by about 1/4", and lengthened it by 3/8" at the inseam.

- On the front pieces, I slashed the top edge and added 1/2" to the waistline  (basically moving the width of the additional back dart to the front). 

- The latter meant that I had to realign the front pleat to keep it centered over my leg. 

- I cut the waistband in two pieces and seamed them at CB. I like to do this so that any future change at the waist is easier to do. I also cut both pieces about 1" longer than the pattern. And I recommend doing this. You'll have more fabric at hand when you do the finishing around the zipper and the front fly.

After I attached the waistband, I could see that the pants were simply too high on me in the back and on the sides. They fit better when I hitched them up. So off came the waistband. I removed 1/2" from most of the top edge of the pants, pocket to pocket, and reattached the waistband. This simple change gave me a much nicer fit. 


On the subject of fitting: I'm very happy with the way my britches fit. The front is nice and flat, the pockets don't pull open, the waistband is perfect, and my back wrinkles are symmetrical! I decided that if I tailored them any more, they would start losing some of their character - they're baggy trousers, after all.

I'm making more! Ciao - Coco