Saturday, February 22, 2014

Vogue 8950 Pieced tunic...


First, thank you all for the get well messages - I'm still off my feet, but feeling better. Poco a poco! Meanwhile, I've managed a bit of sewing. Otherwise I would lose what little I have left of my mind!

Back story, if you visit my blog from time to time, you know I have a love affair with loose fitting clothes, maxi dresses, tunics, wide-leg pants. Over the last year or so I've sewn so many knits that I've collected a lot of nice pieces that are not enough for much more than a tank top - what to do? So I've been looking for a pattern to use to have some fun.

Enter Vogue 8950! What a cute pattern. Perfect piecing and lots of options.


Having said that, I made my first version from a fabric I found at JoAnns, a poly/rayon jersey that has a vertical stripe - how unusual. But it really works with this pattern. I was able to cut the large pieces - skirt, sleeves - on the grain. And the very wide stripes made it so much easier to match up the pattern :-)


The black stripes don't quite match in the front, but do match in the back. I had to make a choice. The front and back of an upper sleeve and armhole are simply not the same! And I have a sloping right shoulder. Add in the two-piece sleeve and bodice - I spent a lot of time working this out, and I'm happy with the result.


Here's a cute feature - a side vent! I'm not a big fan of side vents, but this one works really well.


Sewing notes:

  • The pattern suggests turning under the neckline for a 5/8" hem. Not! I trimmed 1/4" from the neckline and attached a self-fabric binding using a 3/8" seam. I attached the binding on the wrong side and turned it over the seam allowance. Then folded the raw edge and topstitched it on the right side. Note: I cut the binding from the black stripe. Although it was on the vertical of the fabric, it had just enough stretch, about 15%, to work as a binding.

  • The pattern has absolutely NO finished garment measurements! Not on the envelope and not on the pattern pieces. Which meant spending some time putting the pieces together and measuring them out. I really didn't mind, I do it anyway, but I was surprised that Vogue offered no help whatever. I sewed a size 14, my usual size, but drafted the skirt out to size 16, working from the top edge to 12"  below the waistline (the widest part of my hip). 

  • As a precaution, I added 1" to the hemline. I'm 5'7", but like my tunics to go well past the crotch of my pants... Worked well, I only took up a 5/8" hem. I also cut the back hemline even with the front. The back of view C is about 1.5" longer than the front and IMHO just looks like a mistake instead of something intentional :-)

  • The sleeves were almost perfect, with a 1" hem on my right arm (my 'long' side). Which might be a caution for someone else - I have short arms!


Some pics of the inside - you can see the slight curve in the front and back bodice seams.


This was really fun to sew. And I'm looking forward to pulling out my remnants and making a mess in the loft for my next version. Hope everyone enjoys a nice weekend...

Ciao! Coco

Monday, February 17, 2014

My double-toe-loop sit-spin disaster...


On Wednesday, I got up from sitting cross-legged in the garden, planting pretty little sedums - and only my top half got up. My feet stayed crossed and I sat back down on them, hard! hmmm. No broken bones, but my left foot is not pretty and has developed cellulitis. I'm hobbling around, off the crutches now, onto a cane, but no modeling for me. Made it up to the loft to take some photos this morning, Emile is kindly filling in.


My February Vogue 8819 cardigan is ABB - all but buttons! I decided to add them to give this cardi a little jazz, it's kind of plain in a solid fabric. In the next photo, the white threads mark the area that will have 3 buttons.


The back is so pretty (the colors are a little weird in these photos - my walls really are a goldfinch yellow, so the light gets funky, no matter what I do).


I've also been working on a muslin of Kwik Sew 3782, a simple bow tie blouse. It really is a 'quick sew' - the bias collar and ties are all one piece and are slipped through a casing at center front. It has a front, a back, and a sleeve or not. The pattern doesn't have a lot of finish - no facings, plain seams, a fumbly attachment of the casing. Good reasons for a muslin. 


I'm using a very inexpensive percale for the muslin. It's very soft and drapey, much like a rayon challis, which is my target fabric for the final version.

The biggest change I'm making is to the center front - I want to have buttons (again with the buttons!). This was so easy, because the area behind the casing is about 4" wide.  I just cut the blouse straight up the center, giving me 2" on each center front. Then I added interfacing to the front and folded it back  to form the plackets.


I really like this bow. Just about perfect. I cut it a couple inches longer than the pattern, thinking it would be easier to shorten than lengthen if needed. But I like it as it turned out.

Here's the reason I got off track and started working on this blouse - it looks so pretty under the cardigan!


And since I'm sitting around so much, I've been thinking it might be fun to adapt this bow tie and neckline to Katherine Tilton's layered dress, Butterick 5881, in knit fabrics with long skinny sleeves...


I'm not totally worthless. I'm glued to the Olympics (curling is my very favorite winter sport, followed by snowboarding), I've knitted scarves for my niece and nephew, in colors matching their winter coats, and I'm really enjoying reading 'The Plantagenets' by Dan Jones.


Bye for now! Coco

Wednesday, February 5, 2014

Thinking about my February garment of the month...


Vogue 8819


I've been fascinated by this cardigan pattern ever since it came out last year. The lines are so sleek and elegant.  Love the raised waist in the front and the even higher waist in the back. And the line from bodice to hem is so pretty and flattering.

I made a muslin in November in a size Medium - and I'm glad I did! It was pretty skimpy. Tight in the arms and quite a bit shy of meeting across the bust.

Interesting! I should have caught the problem with the sleeve, I usually measure the pattern. My fault. The bodice surprised me. Perhaps the bias cut of the pieces (all of them!) impacts the fit just enough to make a difference.

So I waited for Vogue patterns to go on sale, put pennies in the jar, and now I'm ready with a size Large pattern and some pretty fabric for my February garment.

Inspiration - lots of it! February is my birthday month, amethyst is the birthstone, and I love purple :-) And, cross my heart, I went out to put fresh water in the bird bath this morning, and look what's blooming...

Amethyst polyester matte jersey


I've had painters all over the house and in the yard for a week and a half. I can hardly believe anything would put out a bloom in all this noise and activity. wow. I am so grateful. 

Bye for now! Coco

Friday, January 31, 2014

Little cheetah PJ's...Jungle January!


Quick, Coco! You'd think I'd been off on safari, I'm so late getting into Jungle January!

Actually, there is a cute story behind these little PJ bottoms. My grand nephew has apparently been asking for cheetah PJs for ages, a message passed on to me by both his mom and my sister. With his birthday and my grandson's coming in March, 2 days apart, I started looking for fabric early in January. Wow - there must be 10 variations on cheetah prints. What to do? I sent choices 4 to the jury...

1

2
3
4
I thought #1 would be the winner - wrong! Good thing I asked, #3 won!

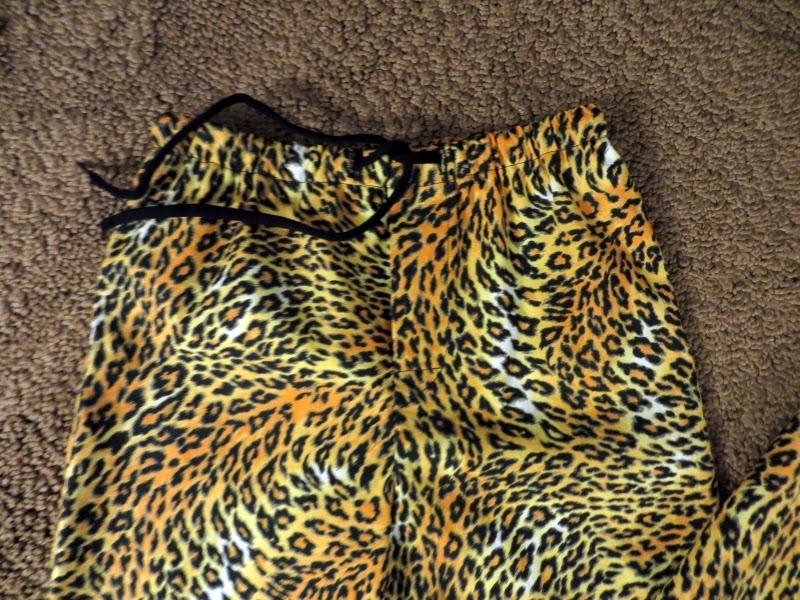
I used Butterick 4635, a wonderful children's pattern with robe and PJs in sizes 3-4 and 5-6 (I made my grandson a flannel robe two years ago, he was only 2). 


And the multi-sizing works well for multi-kids! There is no such thing as making only one member of a family a pair of PJs :-) Notice there are three pairs, three sizes, in my pic. Nephew, niece, and grandson - I cannot wait to see all three in their jammies!! 

The boys have working flys, and the little lady, of course, does not. The waists have sewn in elastic and a drawstring (I used wide 45" shoelaces, perfect). And a 1.5" hem so that they can keep growing - and these would be cute as short PJs as well.


Edited a couple hours later....

I ran down to AC Moore this morning to buy black and red yarn for a neck scarf for my nephew (a personalized request from him this past weekend. How could an aunt resist!) I already have pink and purple for his sister... Anyway, look what I found! Headband toggles, perfect for the drawstrings on the PJs because they have two holes! Moms won't have to worry about the consequences of ties coming undone. Ooo ahh.


Grrrrr.....rrrroar! 

Ciao! Coco


Tuesday, January 28, 2014

January Garment Complete! The fleece coat...


Well, in the end I didn't wear my fleece coat to Charlotte over the weekend - it was cold! in the 20's the whole time. So I took something warmer. But I did finish it before the end of the month. Major accomplishment!

In an earlier post, I talked about my inspiration for this project, pretty maxi coats from Sundance and BurdaStyle. And deciding to draft my own pattern using the liesl+co Late Lunch Tunic.

Late Lunch Tunic
Fleece Coat


Using fleece was a practical way to make a wearable muslin. I would love to do this coat in a kilim or tapestry fabric. Now that I have the kinks out, I can start thinking about the more expensive fabric.

Little touches...

The back of the coat is straight from the tunic pattern, just elongated.


The sleeve is two pieces. The first is the original tunic sleeve. The second piece completes the length, with topstitching to accent the joining seam.


Originally I put in side seam pockets - and took them out in favor of patch pockets. I like the look and they are easier to reach!


I also left off the buttons. This is a great grab-or-hang-open coat. In a heavier fabric I'll probably put some form of closure, buttons or coat hooks/eyes.


And I didn't put in a lining. I made one, but it was so bulky under the arms, I think because they are cut on, not set in. Had fun with the facings instead!


I'm really pleased with how this worked out. Now I'm thinking about my February garment of the month. It's my birthday, so I have to come up with something special :-)

Ciao! Coco

Thursday, January 16, 2014

The Liverpool Tunic!


What a charming tunic! I'm really excited about this - it just feels right, and it's so refreshing to sew a woven fabric for a change. All those knits have been wonderful, and I'll definitely do more. But I think I need some bright prints in my life right now - time to sew out of the cotton stash.

I've seen this tunic many times on the web, mostly in shops that sell indie patterns. But it just didn't speak to me. Then a short time ago I was reading Kimp's blog, Cotton Creek Sewing (a recent find and I love her blog and her sewing) and found her two versions of the Liverpool. Sold and sold! So pretty.

I looked everywhere for a pattern line drawing, but there simply is not one, so I'll describe instead:

The pattern has 4 hem lengths (shirt, tunic, short dress, long dress) and 4 cuffed sleeve lengths (short, elbow, 3/4, and long). It also has a belt that attaches above the waist in the side seam and looks best (IMO) tied in the back. There are side bust darts and double vertical darts in the front, and a set of vertical darts in the back. Very nice shaping details. The front is closed with a full-length buttoned placket that opens into a collar stand and pointed collar.

OK, I know I've said I'm not a collar lover. And I'm not. But this is a very nice collar :-)

I've been saving this fabric for months - it's so pretty I really did not want to cut into it. Do you ever feel that way? It's JoAnns Legacy Studio Morocco Paisley, 100% cotton. Strangely, one is advised to dry clean. ummm.  I pre-laundered in cold water and dried on delicate, and it looks beautiful. No running or fading.


There are a number of reviews of this pattern on Pattern Review, and they were really helpful. And I found support for my disappointment with the pattern directions. Just not well written, certainly not up to Big 4 quality. Which might make this tunic a little trying for some sewers. E.g., there are NO fitting marks with the exception of one marking the shoulder of the sleeve. And there are NO suggestions to trim seams, not even the ones inside the collar and collar band.

The funniest references - and most trying for some sewers of this tunic - are to the 2 collar pieces as the 'first' and 'second' collar pieces, depending on when they were first handled. Same thing with the collar band pieces. huh. So future sewers, here is a fix for that one:

  •    The collar piece that you interface will be your under collar (it goes on the bottom of the collar).
  •    The collar band piece that you interface will be the outside collar band (it goes on the back of the collar band and marries up with the under collar).

 Sewing notes:

I sewed a size Large in this tunic - a Medium would have fit me, but very closely, and I like my clothes to be on the loose side. While the directions were a little funky, the pattern pieces were great and fit together really well.


I did a 1" vertical adjustment to the bust and front vertical darts (lowered them), and shortened the vertical darts by an inch at top and bottom. I also halved the mid-width of the vertical darts. The bust dart was way too short, ending about 4" from the top of the vertical darts, so I redrew it to be thinner and longer. I wonder if that short dart works for anyone...


I shortened and narrowed the back vertical darts in the same manner, but did not move them down. One little change I made to the design is in the center back seam. I cut the back on the fold and then sewed the french seam down from the neck for 12 3/4". And left it open to the bottom. Just a little something different, and I like the way it looks.


I also altered the long sleeves to get more of a caftan look. I just redrafted the sleeve pattern straight down from the armhole to the hem, making it the same width along its entire length. The hem is turned under 2 1/2" so that any peek-a-boo into the sleeve shows the print instead of the wrong side of the fabric. No cuffs.

Speaking of wrong sides - I fell right into this boo boo. The front placket goes straight into the collar band, the collar turns back, and one sees the wrong side of the fabric at the neckline. It's not awful, but it won't happen again! My next version will have a facing construct under the collar band. Picky picky.


So cute! Kimp mentioned that she cut 5 inches off the ties on her 2nd version, and I'm with her. The ties are a little long, especially since I knotted them (not a bow person).


This was such a fun sew that I'm already working on my next one. As long as my living room is a mess, might as well keep going.


Nothing beats good coffee, the Australian Tennis Open on TV, and sewing :-)

Ciao! coco