Friday, December 25, 2015

A Full Moon for Christmas!


A rare full moon for Christmas - so of course I was outside last night trying to capture the event and maybe snag Santa flying across the moon.

I always struggle with night photos with my Canon Powershot. In this case, ambient light from the street lamps, plus the ever present glow from the city, kept me from getting a clear shot of the moon.

Never one to give up, I went out early this morning to try for a pic in the western sky. The moon had already set! Tonight I'll go out later and try again.


But my early Christmas morning stroll was so pleasant - it was about 76 degrees, breezy, and very quiet. I love mornings.


 Grounded...


I'll be wrapping gifts soon, so here's a look at a year-long project for Ashley and David. I researched our family, my side and their father's, on Ancestry.com and created ancestry books for them.


The book is divided into two sections, by family (my last name is Starnes). 

All artwork is pen and ink, by me...

And has family trees, relationship charts, immigration dates and places, old photos, and odds and ends. About 100 pages of goodies! I used 'MyHeritage', a free family tree maker, for most of the charts and trees. Its reporting tools are much better than those of Ancestry.com. Another plus - it can be downloaded and used offline. 


'A Christmas Story' is playing nonstop on my telly - of course! Wishing you a fun day - Coco

Thursday, December 24, 2015

More Christmas - and still blogging!


It's a fact, I miss blog reads at Christmas. I spend Christmas alone, and then go visit my DD, DSL, DS, and DGS ( gosh what a lot of acronyms...my daughter, my son-in-law, my son, and my grandson) during the week after Christmas and up through New Years Day. It's what we've done for years, ever since the kids moved on, had their own homes, got married,  and etc.

So I love reading blog posts around Christmas!

 My contribution (first of several) to any of you who share this blog reading deficit.


This afternoon I sewed up some special gifts for Ashley and Darrin. And their kitties Nikita and Callisto. I LOVE these kitties. I stay with them a couple times during the year when Ashley and Darrin are traveling. And it is such a pleasure. I would love a couple cats, but I'm allergic. Callisto and Nikita are tortoiseshell cats, sisters and amazing.

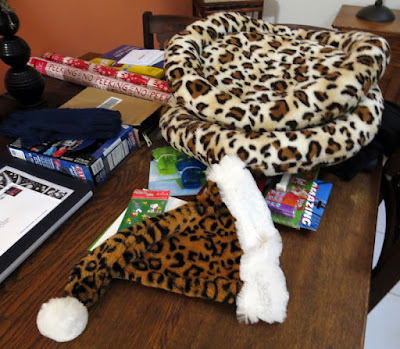
So the kitties win this Christmas...new cuddle beds.

I looked up cat bed patterns online, and even looked at them at retailers. Here's what I decided. Nobody makes them the way I can!

No channel stuffing - 22 x 25. The center of the bed is quilted.


I drafted a pattern about 22" x  25" - an oval that would included 4" bunkers all round, with an eventual bed of about 14" x 17".

My plush blanket fabric is from  A.C.Moore! They usually have these 50" x 70" blankets hanging around the sewing crafts area, and they did not let me down. I got 2 leopard print blankets for about $8 each. And picked up a bag of fiberfill to go with.

So - the construction. This fabric is very forgiving - it has much more stretch across the horizontal than fleece. So I just cut out my pattern, serged it right sides together (to diminish the fluff factor in the loft), and then sewed just inside the serging, for strength. Leaving a 5" opening for the fabric turn...

I turned the bed right side out, and stitched 4" inside to form the rim of the bed - but I once again I left a 5" opening to that I could work some polyfill inside the bed.

Stuffing in 1/2 of the outside channel - you can see it starting to form the rim of the bed.

As you can see in the photo above, I machine quilted the bottom of the bed. At about 4" x 4", just enough to combat the kitty dough kneading. Then I closed that entry way with machine stitching.

And  I stuffed the rims! I wear a size 7 glove, so the 4" channel worked well for me. Do  you know your glove size? I was raised with gloves, an entire wardrobe of gloves, so I know my size. Anyway, I have fairly large hands, width wise, and very long fingers. So, size 7. And a 4" wide channel.

Stuffed rim/channels!

I packed the channels pretty firmly so the kitties can cuddle up to them. How much stuffing did it take?

I used 32 oz. of fiberfill, 16 oz. each,  to stuff the channels on these kitty beds, and small (about 14" x 17" ) ovals of low-loft quilt batting, on the inside area that I quilted, the bottom of the kitty bed.

You could just stuff the bottom of the bed with about 8 oz. of fiberfill, if you prefer. Or just sew in a piece of flannel or something soft instead. I always have quilt batting hanging around, and it's really easy to use for this project. In truth, I robbed from a quilt in progress for this project! and will have to replace it.

Fun stuff - I'm happy! The kitties will really like these, and what makes them happy makes Ashley and Darrin happy.


Great kitty beds. I have lots of leftover fabric, at minimum I'll make some 5" long playthings with catnip involved to go with. I'm also thinking I'll make Archie, David and P.'s french bulldog, a couch blanket. Archie always comes up on the sofa when I'm napping, and curls behind my knees. I think he would love a soft blanky.

It's Christmas Eve - Ciao! Coco

Tuesday, December 22, 2015

Happy, merry, joyful


Peaceful, fulfilling, loving...


My dear blogger friends,


Wishing you and all your loved ones the joy, gifts, and blessings of this wonderful season.

As always - Coco

Tuesday, December 15, 2015

The Iron maxi dress...


I'm laughing as I write - I have never encountered such difficult, tough, iron-strong fabric! No needle would pierce it. Not a ballpoint, microtex, universal, or jersey needle. I ended up sewing this with a denim needle! Yes, it's an ITY knit. But it's extremely close-woven and hard as nails...

I just love this dress. The print is beautiful and has all my colors and a bit of a bohemian vibe. I made it way back in January as a muslin for my MOB dress. And now that year-end is upon us, I thought I should write about it.


It was so hard to sew that I used a more forgiving black rayon knit for the neck binding. My attempts to use the ITY just spat at me. And no hems! By the time I got to the hem point of construction, I gave up and gave in. I just cut the hem and sleeves where I wanted them.


When I took these pics this morning, I had just gotten home from a visit with my dentist. So I'm wearing earrings and, wow, my glasses, both for the first time here on my blog! I have nice jewelry, and I used to load up every day. But being home so much, and with such sensitive skin, I've fallen out of the habit. I think that, in the new year, I'll do something about that!


 More pics...


On other fronts, holiday projects continue. I love all the things on my dining room table awaiting some wrapping and notes. Hope you have such wonderful things going on in your space as well.

Bye for now! Coco

Monday, December 14, 2015

Mini and Mens Hudson pants for the fellas...


I was thrilled when True Bias released the Mini and Men's Hudson Pants, just in time for holiday sewing. It's such fun to make matching items for family members. Last year I made camouflage-print board shorts for DS and DGS - this year it's Hudsons!


I felt pretty secure about the basic design, because I made  Hudsons for myself last year. Making them for the guys...well, the iffy part was sizing. I just didn't know how close the Mini sizing would be to RTW sizes. Or the Men's to body measurements. And for both, the length was puzzling. What was the implication of a slightly dropped crotch, and where would the pants end. At the ankle? Below the ankle?

There are only a few pics of these on the web, mostly of the Mini's. The Men's versions seemed to be made primarily by the pattern testers - and they all mentioned the pattern had been modified since the testing stage. aargh.

In the end, I decided to work with body measurements - waist and inseam - and just make them the way I wanted them to look!


The Mini version (above): I made DGS's pants in size 6, which pretty much corresponds to his measurements - 48" height and 22" waist. The Mini pattern doesn't provide an inseam measurement, so I did some research on the web, and decided to go with a 20" inseam.

I think he'll have fun with these. He was an awesome ninja at Halloween.

Even better, he gets 2 pairs. The ones below match his Dad's, no cuff.


The Men's version: I made David's without the cuff because I know he would prefer a plain hem. I started with the size 38, based on his waist, and added 6" to the length of the leg to finish with a 34" inseam. He's tall, almost 6'4", and the pattern was way too short for him.

Sewing notes for both:
  • I used black jersey knit from Girl Charlee - it's perfect! Specs: 95% Cotton/5% Spandex. Weight: 10 oz, Medium Weight. Stretch: 60%, 30%.
  • From my own Hudson's, as well as the description on the pattern, I know the leg tapers drastically from thigh to ankle, it has a very skinny lower leg. And as with mine, I widened the leg for the Mini and the Men's pattern, thigh to hem. This is just my personal preference for pants on men and boys...but I'm the maker, so I decide :-)
  • I simply don't like to insert elastic in a waistband through its bottom seam, first pic below. This particular waistband is attached to the pants with a 3/8" seam. Not much room for error. IMHO it's fiddly and hard to fit garments with an opening in the waistband, and it's frustrating to rip out and modify the elastic after the opening is closed.

    My approach is much easier. I insert the elastic through the center back seam in the waistband, second and third pics below. This way, if I need to modify the elastic, I simply open that little seam to get at it. Easy peasy.

Instructions


The open seam on the inside of the waistband.
The pin prevents the seam from opening up further than intended.
 
Inserting the elastic.
After finishing the elastic insertion, just slip-stitch the seam to close.

Something is missing on all three - a drawstring. I want to use 5/8" wide, 100% cotton twill tape for the drawstrings. Not 1/2" or 1", not parachute cord, shoelaces, or corded elastic. Picky. I found some on Ebay a couple days ago and quickly ordered 10 yards. Now the funny part - I got a confirmation email and realized it's shipping from Italy, with a couple weeks shipping time once it's mailed. In my rush, I never noticed. Oh well, I have a cotton cord fallback if it doesn't arrive in time.

Nutsy. And for a parting shot, real nuts are falling from the mahogany trees in the back garden. Huge things and hard as wood - I think they're beautiful...


Ciao! Coco

Saturday, December 12, 2015

Holiday dress and other curiosities...


OK, bear with me - it has red in it, and it's the season, so it's a holiday dress! 

Actually, this is another of those hard-to-use fabrics that has been in my stash for ages. And it's an ITY knit to boot. Silky, smooth, and slippery. After I made my first Simplicity 2031 maxi dress in the black and white abstract print ITY, my confidence level went up. So I gave this a go.


Unlike the abstract print, this one was a bit of a beast to place and cut. It has so many shapes and patterns going on...but I love it.


As with my first version, I sewed the size 12, with about 4.5" additional length in the sleeve.


I like the longer sleeve length for myself, but it's beautiful at its original length. Ashley loves hers that way. And once my arms are 'presentable' I might well remove the extra length from both of mine.


A little tip. If you decide to do this in a knit - the pattern suggests woven fabrics, but, hey, that's their opinion. All three of the ones I've sewn are in a knit fabric.

It's a good idea to reinforce the first 5" of the upper sleeve seam, neckline out across the shoulder, to stabilize it. I used a lightening/elastic stitch to sew the seam. And then I sewed a 5" long piece of 1/4" twill tape inside the seam allowance as below.


And serged/cut the seam allowance at 3/8" to finish, from neckline to the end of the sleeve. A steam press to turn the SA to the back, and I felled the entire seam.


The result is a stabilized shoulder and a very comfortable finish on the inside.


Now - those other curiosities.

(1) I just noticed how much red I have in my hair. I just used a new hair dye called 'high-lift brown'. Not sure what that's all about but it's weird! Call it holiday hair. I would love natural, light red hair. Failing that, I'm going to try some other color. No, not blue, as least not for now. Well, maybe a blue streak?

(2) I upgraded to Windows 10 on my laptop back when it came out. And it is a nightmare. I've been using Chrome as my web browser. and it just putters along under Windows 10. And Windows 10 is like Big Brother - do this, not that, use this, sorry you can't use that.  I've done everything I can to fix it (gosh, I have a B.S. computer science, I should be able to do something about it...). But I'm done with it. I'm on Firefox at the moment,  but I'm thinking I'll treat myself to a MAC laptop for Christmas. I have an iMac, which does not fit on my lap! but it's a great computer. Fast, clean, edgy. And I have Firefox on it already. So -  I think I'm done with having a Windows laptop.

I just can't stand the imposed aggravation! It's like having Windows police in my living room!

End of rant. Ciao! Coco