

My final version of the Tessuti Gabby dress, which I used in my pursuit of a 60's-style tent dress.
 |
| Source: fashion.ekstraks.com |

Sewing notes - I drafted size Medium (I'm 5'7", 37" bust, 42" hip), and altered the pattern to be sleeveless:
- Added 3" to the length, and marked a 1 1/8" hem allowance.
- Trimmed 5/8" from the side seams, beginning at the top edge and curing quickly into the existing seamline about 9" below the start point. It's important to keep the fast flare of the dress.
- Trimmed the seam allowance from the front neckline to make it a little deeper and more narrow at the shoulder.

- Lowered the back neckline 3/4" at center back. Redrew the back neckline with a curve from shoulder to CB (it was almost straight across, shoulder to shoulder).
- Made 2 shallow chest adjustments:
- Marked and flattened a 3/8" dart in lower side of the neckline on both sides.
- Changes for the sleeveless styling:
- Cured down the front and back armhole edge to within about 1 1/2" of the bottom edge.
- Scooped more curve into the armhole edge on both sides.
 |
| Fabric: Red Packed Roses cotton calico, JoAnns |
Due to it's volume, a tent dress can look like a sea of fabric. To counter, I used contrast fabric for the armhole and neckline bindings, and added 1-piece, topstitched pockets ( love pockets).

Here's the muslin that tried my patience ( Fussy Post) It's complete, very wearable, and modeled here by Emile. I'll admit that I'm not fond of it, and it will go with donations at year-end.
 |
| Cream Song Birds from Timeless Treasures, from Hancocks of Paducah |

Since Emile is with us, here's a view of the neckline binding. I start by attaching the binding on the inside. Then I turn it over the neckline edge and finish it on the outside. I do the same thing with armhole bindings. This technique doesn't leave any little threads or stitched folds that can irritate my skin.

In the end, I'm glad I stayed with the project, it leaves me with a good sloper for this dress style.

Ciao! Coco
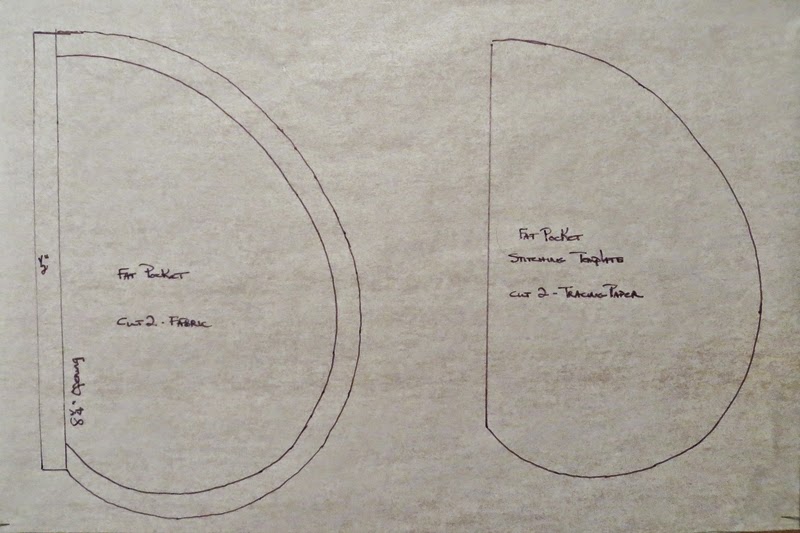
- Cut 2 pocket pieces from your fabric. If you're using scraps, be sure to cut a left and a right pocket! And cut 2 topstitching templates from tracing paper.
- Decide where you will place the pockets. I used a scientific sewist method: I put on my muslin, which has no pockets, and played with the pattern tissue on the outside until it felt and looked right :-) Mine open 10" below the armhole edge of the dress.
- Mark the pocket opening on the seam allowance of the dress front and back.
- On the dress front, finish the edge of the pocket opening area. I used a Hong Kong finish that matches the neck and armhole binding. I lightly hand-stitched the edge in place.
 |
| The front edge of the pocket with the Hong Kong finish. |
- Place the pockets on the dress back, right sides together. Stitch together along the seam line. Turn the pockets outward.
- Pin the dress front and back right sides together. Stitch the seams above and below the pocket opening.
- On the inside, press the pocket over the front of the dress.
 |
| This is post-topstitching. But you can see how the pocket turns away from the seamline and over the front. |
- On the outside front, topstitch the pocket in place, using the tracing paper template as a guideline. And tear away the paper. For some reason, this is really satisfying. Kind of like popping bubble wrap.

Please press and set your stitches all the way through this...
Happy to help with any questions! cocos.loft@gmail.com
Love your dress – it reminds me of a tent dress I made in the Swingin' 60s when I lived in London. I worked in the fashion industry and the pattern came from one of the houses I worked for. I really don't remember how I came to have the pattern but it was a real winner. It had big french darts in the front and a keyhole neckline both of which would eliminate the feeling of too much fabric, yet still allow the shape to be quite "tenty-y". The armholes were more cut in at the shoulder - very summery looking and very comfortable. I made a few because the other bonus was that I could whip one up in a couple of hours. I still love that style of dress though I don't have the arms for it any more. Sighhhhh!!!!!
ReplyDeleteI love it on you - the length looks perfect! I find choosing the final length on this style to be tricky for me (oh, and hemming...). Yours looks great, I would wear it every day. ;)
ReplyDeleteI love the color of your dress. This looks great on you!
ReplyDeleteLove that dress...it looks cute on you!!! I really like the muslin also...I wish you did because the fabric is fun, but I just happen to like Timeless Treasure prints.
ReplyDeleteCute! I bet it is very comfortable, too! I had a tent dress or two in my day. It's fun to see it revisited in such a fashionable way.
ReplyDeleteNice save on the pattern and the red dress looks awesome on you! I do my bindings the same way, much easier at least for me and I get a better finish overall.
ReplyDeleteFinal dress well worth your efforts! I remember those great tent dresses of the 60's. So comfy. Also,thank for the pocket help,
ReplyDeleteGorgeous dress, and I can't wait to try this pocket technique! Seems like it would save fabric AND prevent the pocket from flapping around inside a dress without a waist seam to anchor it to. Thanks so much!!
ReplyDeleteYou ended up with a lovely dress -- you look great in red! I like your pocket technique and your binding technique. I may have to borrow both of those:)
ReplyDeleteYou've nailed the sillouette there. What a great style. Thanks for the pocket details!
ReplyDeleteThis is a cool looking dress on you and your stitching is perfect!! Love the brown accents.
ReplyDeleteYour perseverance has paid off. Love the dress. It looks so cool and relaxed.
ReplyDelete